The AutoOps and TireConnect integration connects tire purchasing and service booking into a simple flow, creating ease of booking for your customers. This article provides a comprehensive, step-by-step guide to setting up and configuring the integration between AutoOps and TireConnect.
Jump To:
Connecting AutoOps and TireConnect
Step 1: Verify Widget Installation.
Step 2: Retrieve TireConnect Location ID.
Step 3: Configure AutoOps Settings.
Connecting AutoOps and TireConnect
Follow these steps to establish the connection between your TireConnect widget and the AutoOps scheduler.
Step 1: Verify Both Widgets are Installed on your Website (AutoOps & TireConnect).
Ensure both widgets are correctly installed on your website (required):
-
TireConnect Widget: Must be installed and functional on your website.
-
AutoOps Scheduling Tool: Must be installed on your website and available on the same page as your TireConnect widget.
If you need assistance installing your AutoOps Scheduling Tool, view our Advanced Website Installation Guide.
Step 2: Retrieve Your TireConnect Location ID
The Shop's TireConnect Location ID is required for AutoOps to communicate with the correct TireConnect.
1. Open the TireConnect Widget on your website.
a. Navigate to the page on your website where the TireConnect widget is installed. If you have multiple locations, select a specific one.
2. Locate the TireConnect Location ID.
b. Look at your browser's URL bar. The location_id is a numerical value within the URL string.
Example URL: https://shop.com/tires#/!search?season_id=2&location_id=**12345**&search_by=vehicle
Example ID: 12345
3. Copy the ID: Copy only the number (e.g., 12345).
You will now paste this ID into AutoOps and configure the remaining settings. Keep reading for full instruction to finish your AutoOps & TireConnect Integration.
Step 3: Configure AutoOps Settings
1. In AutoOps, navigate to the Partner App page.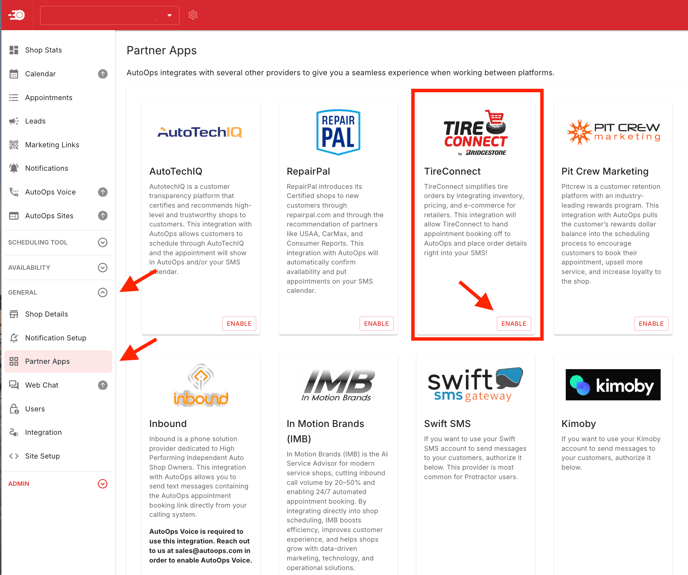
2. Find the TireConnect card, Click Enable.
3. Configure AutoOps Options:
a. Auto-Enable Integration: Leave this enabled 99.9% of the time. If you suspect you may need to disable this, reach out to support@autoops.com.
b. Location ID: Paste the TireConnect Location ID you copied in the steps above.
c. Embed Mode URL: Useful if you're using AutoOps in embedded mode and do not want AutoOps to pop up over of the TireConnect page. Leave blank to have AutoOps open on top of TireConnect.
d. Open Mode: Allows you to choose whether you want AutoOps to open BEFORE or AFTER a TireConnect Quote or Order is created.
- For more on TireConnect Quotes vs. Orders see the TireConnect Flows section below.
- Note:
For Quotes (Request Appointment Flow) - Currently the default is BEFORE and is only editable by an AutoOps team member, reach out to support@autoops.com for changes.
For Orders (Order Your Tires Flow) - Currently the default is AFTER and is only editable by an AutoOps team member, reach out to support@autoops.com for changes.
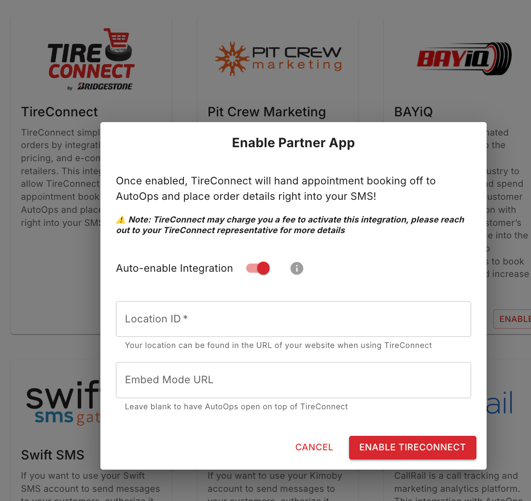
4. Click Enable TireConnect.
If you have multiple locations, you will need to repeat this process for each location you would like to enable the integration for.
TireConnect Integration Flows
AutoOps seamlessly integrates with TireConnect's two main customer flows—Request Appointment or Order Your Tires—allowing shops to choose exactly when the scheduler appears to their customers.
These flows and their associated buttons are managed directly within the TireConnect Dashboard, giving you the flexibility to configure AutoOps to open either before or after the quote or order is processed.
You will need to go into your TireConnect Dashboard and select the flow you would like to utilize.
Flow 1: Request Appointment Flow
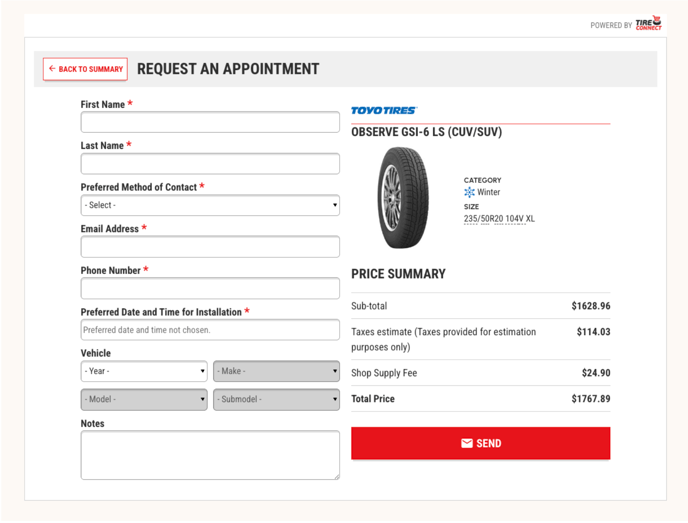
If the Request Appointment flow is set within the TireConnect Dashboard for the AutoOps Integration, the following order of operations will happen depending on your AutoOps Open Mode Settings for the TireConnect integration.
This flow is typically associated with generating a TireConnect QUOTE.

⏪If AutoOps Open Mode is set to Before (Default Setting):
-
- The AutoOps Scheduling Tool will open as soon as the user clicks the Request Appointment button on your website widget.
- AutoOps will capture Name and Vehicle Information.
- A TireConnect Quote will NOT be created, therefor TireConnect will not send an email with Quote details as there is no quote.
- AutoOps will send an email with Appointment Booking Details, this will not include quote information.
⏩ If the AutoOps Open Mode is set to After:
-
- TireConnect will collect more information after the user clicks the Request Appointment button.
- The Scheduler will open after the user clicks Send and customer info will be prefilled in AutoOps.
- A TireConnect QUOTE will be created and TireConnect will send an email with Quote details.
- AutoOps will send an email with Appointment details.
Flow 2: Order Your Tires Flow
If the Order Your Tires flow is set within the TireConnect Dashboard for the AutoOps Integration, the following order of operations will happen depending on your AutoOps Open Mode Settings for the TireConnect integration.
This flow is typically associated with creating a TireConnect ORDER and processing payment.
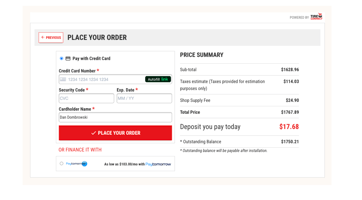
⏩ If the AutoOps Open Mode is set to After (Default Setting):
-
- TireConnect will collect more information from the customer after the user clicks the Order Your Tires button and completes their purchase.
-
- The Scheduler will open after the user clicks Place Your Order and the Customer Information will be prefilled in the AutoOps Scheduling Tool for ease of booking.
- A TireConnect Order will be created and TireConnect will send an email with order details.
- AutoOps will send an email with Appointment details.
⏪If AutoOps Open Mode is set to Before:
-
- The AutoOps Scheduling Tool will open as soon as the user clicks the Order Your Tires button on your website widget.
-
- AutoOps will capture Name and Vehicle Information.
- No payment information will be collected from the user.
-
- A TireConnect Order will NOT be created, therefor TireConnect will not send an email with order details as there is no order yet. The customer has not completed their purchase; they have only booked their appointment at this point.
-
- AutoOps will send an email with Appointment details.

We're here to help
If you have any questions or run into issues, you can reach out via:
- Email: Click here
- Chat: Click on the help button the lower right of your dashboard.