⚙️✅ Access: Digital Glovebox is part of the Ultimate plan. Ready to level up? Upgrade now to get access, click here..
⬇️ Watch the quick tutorial below 👀
🚀 ➡️ Click Here to Begin Customizing Digital Glovebox 🚀
Setting up Digital Glovebox is easy and takes only a few minutes:
Step 1: Choose How to Give Customers Access to Digital Glovebox
-> Individual Access/Manual Activation (Default Mode)
Step 2: Add Additional Shop Users (Optional)
Step 3: Customize Your Digital Glovebox Branding
-> Preview Your Digital Glovebox Portal
Step 4: Add the Digital Glovebox Portal to Your Website
To learn how your customer's can access their Digital Glovebox profile, Click Here.
Step 1: How to Give Customers Access to Digital Glovebox
Choose how you want to give customers access to Digital Glovebox.
-
Manual Activation (Default Mode) - Enable Digital Glovebox access for individual customers or business profiles one at a time. This option gives you full control over who receives portal access.
-
Automatic Access for All Customers - Turn on Digital Glovebox access for all customer profiles in your shop. This option makes it easy to give everyone access at once.
Manual Activation (Default Mode)
This mode is turned on by default; you are able to see this in Steer under Settings > Digital Glovebox.


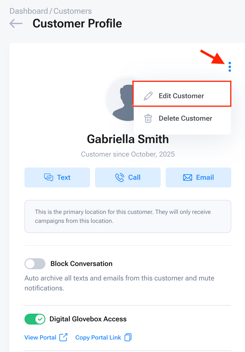
On the customer profile you will see a new toggle with Digital Glovebox Access.
3. Turn this toggle ON.
 >
>
Once activated this customer will have access to Digital Glovebox. By turning Digital Glovebox on, you will give access to all phone numbers & emails in the customer profile that are added as Primary Users.
Automatic Access for All Customers
To give access to ALL customer profiles at once, head to Settings > Digital Glovebox, and scroll to the bottom. Here, you will select Activate for All:

Step 2: Adding Additional Users to Digital Glovebox (Optional)
In some cases you may want to give other users, outside of the primary contact, access to a specific customer's Digital Glovebox profile.
- Business or Fleet Accounts with multiple users needing access to all vehicles.
- Family accounts needing access to all vehicles.
To add another user to a customer's Digital Glovebox profile:
2. Once on the customer profile, click Edit Profile (the three dots by the profile picture). Scroll down and you will see a new section for adding additional users.
 ➡️
➡️ 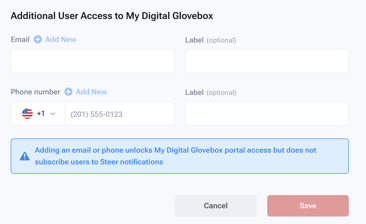
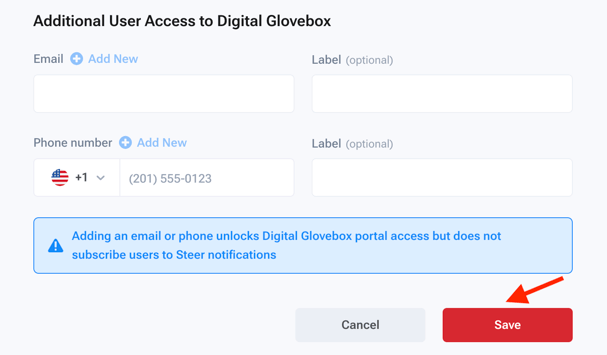
Please note: Any user added in this section won't get any marketing or campaigns. This is only for access to Digital Glovebox.
Step 3: Customize Your Digital Glovebox Branding
Customize how Digital Glovebox appears to your customers by controlling the different branding aspects of your shop's portal.
In Steer, go to:
1. Settings > Digital Glovebox.
2. Scroll to Brand Customization.
3. Click Customize Your Digital Glovebox.

4. You will be pulled to the following screen to customize your Digital Glovebox.

In this area you can customize the following aspects of your Digital Glovebox:
-
Company Logo: appears on the Digital Glovebox login screen.
-
Customize Colors: controls the background color of the Digital Glovebox portal.
-
Featured Image: appears in the main body of the Digital Glovebox. If you do not upload a custom image, the default image will be displayed.
-
Image Caption: customize how you describe Digital Glovebox to your customers.
-
Headline: keep it concise, and catchy (Default Text: Everything About Your Vehicles, Made Easy).
-
Description: let your customer's know what Digital Glovebox does for them (Default Text: View your full service history, track upcoming maintenance, and manage all your vehicles in one place).
-
-
Terms & Conditions Link: include your shop's Terms & Conditions.
-
Shop Contact Info: display shop contact information like:
-
Custom tagline (Default Text: Need assistance or havequestionw? Contact us).
-
Shop email address
-
Shop phone number
- Website link
-

Remember to Save your Customizations!
Preview your Digital Glovebox before Publishing
-
Navigate back to the Digital Glovebox main screen, and scroll down.
-
Click your Digital Glovebox link to launch a preview from a customer's perspective.

Once satisfied with your Digital Glovebox branding, add Digital Glovebox to your website and share with your customers.
Step 4: Add Digital Glovebox to your Website
Make it easy for customers to log in to Digital Glovebox from your website and easily access their profile.
In Steer, go to:
1. Settings > Digital Glovebox.
2. Locate the Website URL Generation section.

You have two options to add the Digital Glovebox Login to your website:
-
Add the link to a website button (for example: “Login to Your Digital Glovebox” or “Manage My Vehicle”) utilizing the Portal Link URL
- Copy your link from Steer and paste into a button on your website.
-
Paste the code provided into your website to embed the login portal directly.
To learn how your customer's can access their Digital Glovebox profile, click here.