Jump To:
Step 1: Enable the FasterLines Partner App in AutoOps.
Step 2: Configure Walk-In Eligible Services & Messaging.
A. Turn On Walk-In Availability.
B. Configure Walk-In Eligible Services
C. Configure Walk-In Eligible Messaging.
Step 3: The Customer Experience of Walk-in/Live Wait Times.
Step 4: Advanced Integration Details and Edge Cases.
A. Shop User - Need to Know Information.
B. Walk-In Appointments - General Information.
Step 1: Enabling the FasterLines Partner App in AutoOps
The FasterLines Partner App must be enabled by an AutoOps administrator. In order to enable the partner app your shop must have completed install and onboarding with FasterLines.
If you are live with FasterLines, reach out to the AutoOps team to enable the integration. Email or Chat in via your AutoOps Dashboard
If you are not yet using FasterLines, contact our team to purchase: https://www.autoops.com/live-wait-times.
Once our team has enabled the FasterLines Partner App, you will see a Walk-In Page, in your AutoOps Dashboard under the Availability tab. Keep reading to finish configuration so your customers can see your live wait times.
Step 2: Configure Walk-In Eligible Services & Messaging
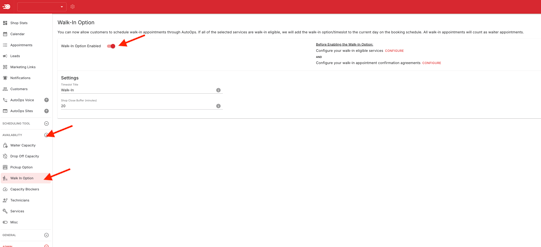
A. Turn On Walk-In Availability.
In AutoOps, navigate to:
1. Availability > Walk-In.
2. Turn ON the Walk-In Option.
3. Configure settings such as:
a. Timeslot Title - this title will be displayed for the walk-in timeslot in the booking flow as opposed to a specific time.
b. Shop Close Buffer (minutes) - This buffer is added to the estimated wait time to determine when to stop showing wait times to the customer. Consider using a larger buffer to account for the appointment duration as well.
i. Example: estimated wait time = 20 mins, shop close buffer = 20 mins, shop closes at 5pm -> the scheduler will stop showing wait times at 4:20pm.
Next you will need to Configure Walk-In Eligible Services:
B. Configure Walk-In Eligible Services
1. Click Configure beside "configure your walk-in eligible services" at the top of the Walk-In page, or navigate to Availability > Services.
2. Click the Pencil Icon to edit a service to add Walk-In eligibility to the service.
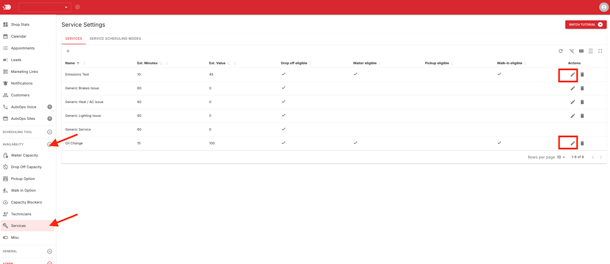
3. Under Advanced Options, check Walk-In Eligible to display wait times and allow customers to book Walk-In appointments for this service.

4. Repeat for all services you would like to display wait times and allow Walk-In bookings.
Next you will want to configure Walk-In related messaging that displays throughout the booking process.
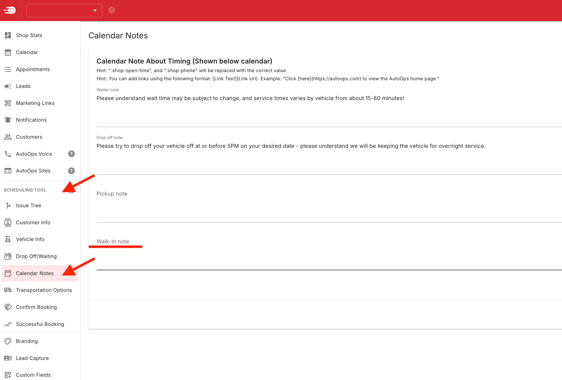
C. Configure Walk-In Eligible Messaging.
1. Under Scheduling Tool > Calendar Notes you are able to input messaging relating to Walk-In appointments; this messaging will display under the calendar during appointment date selection of the booking process for a walk-in appointment.
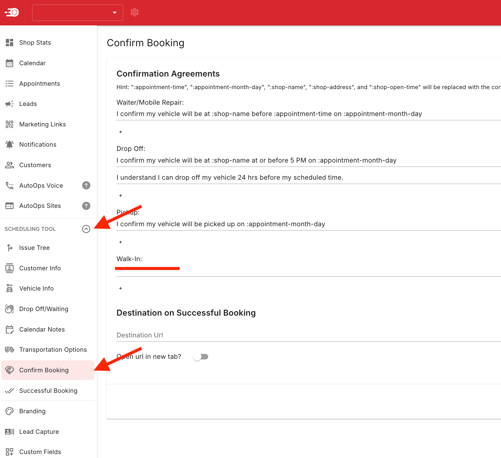
2. Under Scheduling Tool > Confirmation you are able to input messaging that relates to your shop's walk-in confirmation agreement, this messaging is displayed on the appointment confirmation screen during booking a walk-in appointment. If left blank, only the estimated wait time will appear on the confirmation screen.
a. The confirmation agreement messaging is displayed and must be checked to proceed for booking.
b. If the confirmation agreement messaging is left blank, no agreement will be shown and the customer can proceed to book. Learn more in Step 3.4.
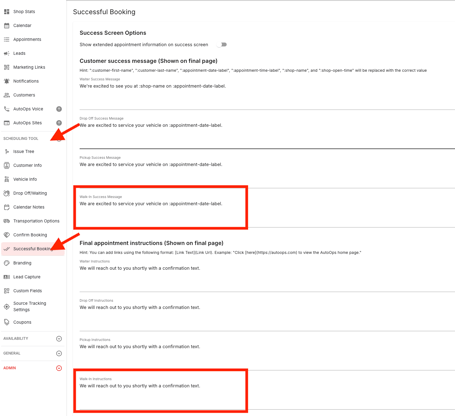
3. Under Scheduling Tool > Successful Booking you are able to input information regarding walk-in appointments that will display on the success page once a customer has a completed a booking for a walk-in appointment, this includes an area to put specific walk-in appointment instructions.
Step 3: The Customer Experience of Walk-in/Live Wait Times.
When a customer is booking a walk-in appointment through your AutoOps Scheduling Tool, wait time indicators are visible in several places during the booking process:
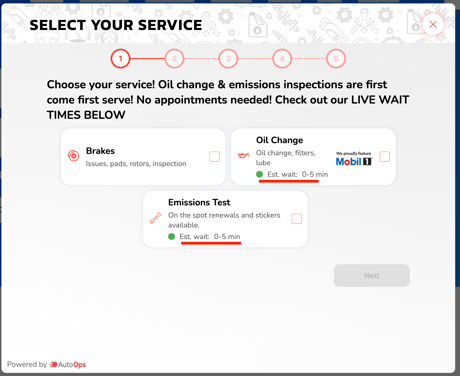
1. Issue Tree: the customer can see estimated live wait times for eligible services on the main page of your issue tree.
a. A service will only show as walk-in eligible on the issue tree if the service itself is configured for walk-ins.
b. The walk-in time slot will only show if all selected services are walk-in eligible.
c. The walk-in time slot will never show if the customer selects multiple services and some of them are not walk-in eligible.
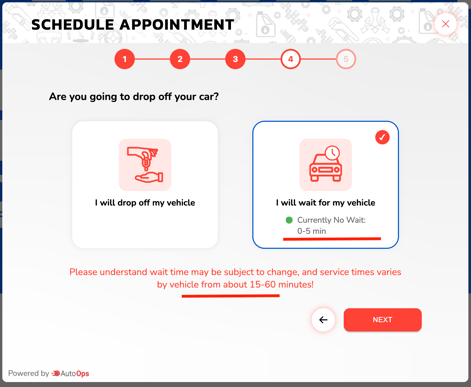
2. Appointment Type Page: The walk-in time slot will only show if the customer chooses the "wait" option.
a. A note will appear beneath the wait option.
3. Calendar Page: The walk-in time slot shows up for the current day only; it is not available for tomorrow, or any other day in the future.
a. Selecting the walk-in time slot will display the current wait time and the configured calendar note.

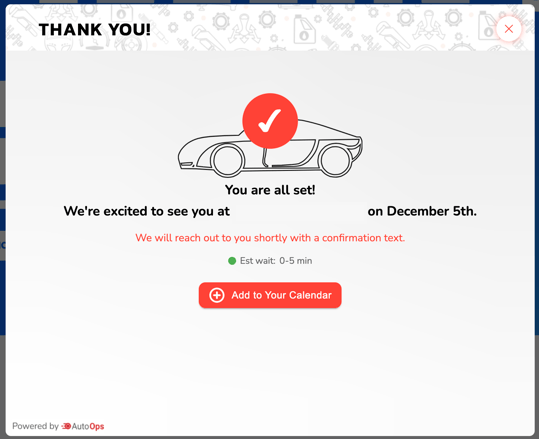
4. Confirmation Page: The date/time area shows the date, "Walk-in," and the estimated wait time; it does not show a specific appointment time.
a. The confirmation agreement messaging configured in Step 2-C.2, is displayed and must be checked to proceed.
b. If the confirmation agreement messaging is left blank, no agreement will be shown and the customer can proceed to book.

5. Success Page: The success page displays the walk-in success message and walk-in instructions configured by the shop.
6. Customer Text Message: The customer receives a hard-coded "walk-in text message," which overrides the waiter notifications. The language of this message is not currently adjustable.
Step 4: Advanced Integration Details and Edge Cases.
A. Shop User - Need to Know Information:
- Shop Management System (SMS) Job Detail Page: A "walk-in" indicator is shown on the job detail page in the SMS. This view will vary based on SMS used.
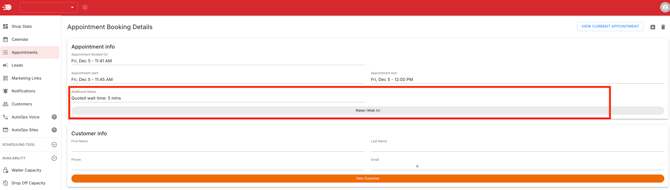
- Appointment Detail Page (AutoOps): A "walk-in" indicator is present on the appointment detail page in AutoOps.
- Admin and Admin Lead Emails: The admin booked appointment email notification, and the admin lead email notification will both have a walk-in indicator for booked appointments; similar to waiting/drop-off appointments.
- Leads: If a lead comes in and chose the walk-in time slot, the lead will have the walk-in indicator.

B. Walk-In Appointments - General Information:
- Date Only Booking: If your shop uses the date only booking feature, the walk-in time slot will not be shown for date-only bookings.
- Preference Time Slots: If preference time slots (e.g., morning/afternoon) are used and shown, the walk-in time slot will still be included for the current day.
- Appointment Type: Walk-in appointments are stored as waiter appointments and use waiter capacity when availability is calculated.
- Dashboard Scheduling in AutoOps: Scheduling through the AutoOps Calendar on the Dashboard does not involve wait time calculation; wait time functionality is only for the customer-facing portal.
- Wait Time Calculation: The wait time calculation checks the shops holiday/capacity to ensure wait time is not shown if it is a shop holiday/the shop is closed.
- If you have questions regarding how FasterLines is calculating your shop wait time, please reach out to our team.
- FasterLines will provide monthly reporting on your shops wait time data.
- Wait Time Storage: The quoted wait time in minutes is stored, though it is not currently displayed in the AutoOps Dashboard.